Depth Map for Seedance 2.5: How to Get Past the Face Filter
Seedance 2.5 refuses to generate when a recognizable face or a piece of someone else's film is in the frame. The company is fighting celebrity deepfakes, but the filter hits ordinary people too — it sometimes rejects your own selfie. There is a way around it, and it is not a hack. The model happily accepts a depth map: a black-and-white image where brightness shows the distance from the camera. No faces on it, only the geometry of the scene. Below is how to make one from your own video for free, right in the browser, and what to do when generation still fails.
Why the model sees a celebrity where there is none
Seedance filters are trained on faces. Their job is simple: stop anyone from faking a famous person. The catch is that "famous" is decided by facial geometry, not by a name in the credits. A similar eye shape, the same jawline — and you get a rejection.
Film frames are even easier to block: copyright protection kicks in. The model recognizes the scene and refuses the whole thing, even if all you wanted was the camera move.
Two different bans, one identical result: a red error and wasted time.
A depth map: geometry instead of faces
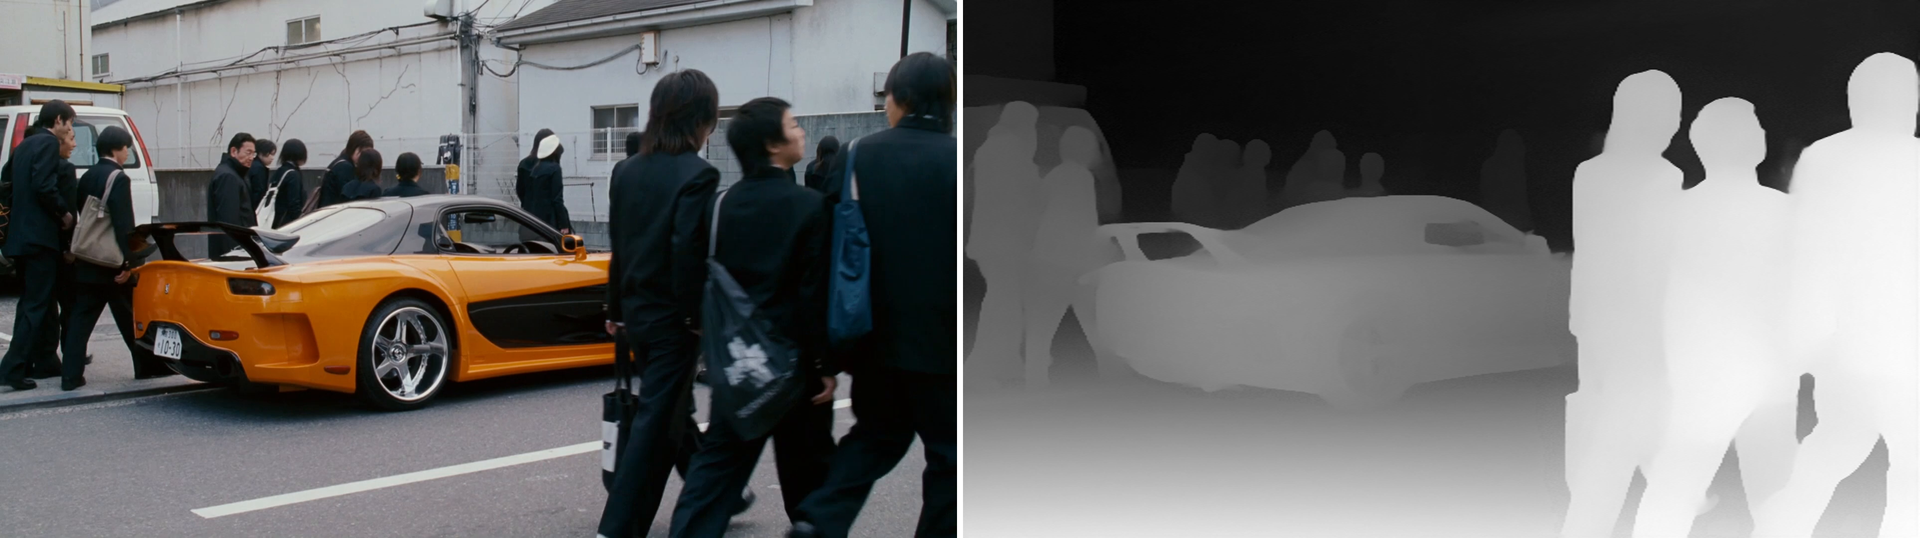
A depth map is the same video redrawn in shades of grey. The closer an object is to the camera, the brighter the pixel. The background falls into black, the foreground goes white. No textures, no skin, no eyes — just the relief of the scene.
That is the whole point for the filter. There is nothing to check: no faces. And for generation there is everything it needs: where the objects stood, where the camera moved, how the shot changed. You are not copying someone's frame — you are taking the motion and the layout, and the model draws its own picture from scratch.
An honest limitation: this is not a magic "bypass everything" button. If your prompt asks for a specific actor's face, the rejection comes back. A depth map solves geometry and motion, not identity swapping.
How to turn a video into a depth map — free, with no upload
On our site it is a separate model in the video section: Depth Map (free). It sits in the model list under MiniMax. Pick a video, press the button, and everything is computed on your own device.
Under the hood: Depth Anything V2 Small (Apache 2.0 licence) runs right in the browser through ONNX Runtime Web. If your browser has WebGPU, the GPU does the work; if not, there is a CPU fallback. Frames are decoded with WebCodecs and then assembled back into a video at the original frame rate and the highest resolution your browser can handle.
You get MP4 or WebM, whichever the browser supports. There is a result preview, a "near bright / near dark" switch and three colour maps: grayscale, Inferno and Viridis. Frame-by-frame progress is visible, and a long run can be cancelled.
Two things matter most. First: the file never leaves your computer — not to our servers, not to anyone else's. Second: no tokens are charged, because there is no paid API in this model at all. Model weights and runtime files are cached in the browser, so the next visit starts faster.
Where it gets awkward. You need Chrome or Edge — WebCodecs is not everywhere. A long clip on the CPU is slow: a minute of source video can take several minutes. And do not throw 4K at a weak laptop — start at 720p, check the result, then raise the resolution.
Character turnaround: two mistakes that ruin the result
The second trick from the same video is a proper character turnaround: one image that shows the face and the clothing separately. How you assemble it decides whether the face drifts during generation or stays put.
Mistake one: the face and the clothing are drawn at different scales. The model does not read them as one person and starts inventing proportions. Mistake two: the turnaround is glued together from different people — then the output is an averaged stranger's face, and the filter fires again.
The version that works: one turnaround, one person, the same light and angle on both parts.
When generation still fails with a "recognizable person" error
Sometimes the depth map is in place, the turnaround is assembled correctly, and Seedance still says no. That means one of the images is the problem, and you have to find it.
The method is elimination. Remove the references one at a time and run again. The moment generation goes through, the last image you removed was the culprit. Rebuild it, or replace it with a depth map.
Slow? Yes. But there is no guesswork: three or four runs show you the exact cause.
And the second trick from the same video: overlay a plain grid on the offending image — even squares across the face. The filter no longer sees a whole face, while the features stay readable for generation. You can add the grid in any editor, or simply ask an AI to "overlay a square grid on this photo".
Moving the camera from any film into your own scene
The same trick works without swapping faces. Take a frame from a film, turn it into a depth map, hand it to the model with your own prompt — and you get your scene with the same camera move: the same push-in, the same turn, the same rhythm.
That is how trailers, parodies and ads get a cinematic sweep without hiring a crane operator.
Where to start
The order is simple: first the depth map — free in your browser, no upload and no tokens. Then the generation itself — Seedance 2.5 on our site, where the character turnaround and references live.
If the first attempt does not land, start with a 3–5 second clip. It shows both the camera move and how the face behaves, and it costs a fraction of the time and tokens.